


hanukkah is here! 🩵
...and so is this waylaid newsletter.


Let me start with a giant, all-caps apology: SORRY!!!! This newsletter was supposed to go out last week. It did not. With maternity leave quickly approaching and a never-not-moving toddler keeping me on my toes, I had to pick and choose where to focus my remaining energy—and opted for documenting my Hanukkah prep in real time rather than pausing to write (hence all the videos I’ve shared this week!).
Anyway, thank you for your patience.
I’d promised to include a few things in that (this?) long-delayed newsletter. Namely, the recipe for my Hanukkah frozen whipped cream. And “lots of other Hanukkah inspiration.” We’ll get to both after the jump.
But there were also a few things I didn’t specifically promise (because I wisely stopped making newsletter promises); I’m including them here as a bonus “thanks-so-much-for-waiting-can’t-believe-it’s-already-actually-the-holiday-WHOOPS” surprise:
The details behind everything in my Hanukkah cookie box,
Some homespun wrapping ideas for any last-minute gifts you’ve got planned,
An article that so poignantly captures the complex emotions that surface before the holidays (find that here),
…and a fantastic video (here) that’s likely to lift your spirits, especially if you love all things Jewish and Broadway and New York. (🙋🏻♀️.) You will weep.
(I guess these things technically fall under the category of “lots of other Hanukkah inspiration” and therefore don’t qualify as a true “bonus.” Once again. In caps. SORRY.)
I’ll quickly wrap up with this: I’m genuinely so excited for Hanukkah this year. I don’t think I’ve felt this kind of connection or anticipatory joy for the holiday since I was a kid. Of course, part of that comes from the sheer contrast to last year’s unbearably heavy Hanukkah. That pain hasn’t disappeared—it can’t—but this year, I’m finding some space for hope alongside it. When I think about lighting our family menorah tomorrow night and throughout the next week, I picture each candle with double meaning: part yahrzeit candle, carrying our continued grief, and part beacon, stubbornly insisting on the possibility of brighter days ahead.
But—on a somewhat less profound note, there’s also the fact that last year, newborn Jacob…had no idea what was going on, and I was an exhausted new mom just trying to keep my eyes open past candle-lighting. One-year-into-motherhood Rebekah is a much more cheerful, well-rested gal, and toddler Jacob is starting to catch on. The fact that he’s actually aware-ish of what’s happening has turned crafting this second family-of-three Hanukkah into something so special.
I hope even a small piece of my joy finds its way to you through this newsletter.
Okay, time to dive in:
A very festive hot choc topper.

…frozen whipped cream!
I love this alternative to traditional marshmallows, which somehow does not melt. Or did not when I made it, anyway. I let it sit there in hot, then warm, then cold hot chocolate for an entire hour (hey, sacrifices must be made for the sake of frozen whipped cream recipe testing) and—yep, still star-shaped. On some level, this was concerning. But it’d also prove very convenient if you were planning on serving a crowd.
A quick tip: When you’re picking out cookie cutters, avoid intricate designs—tiny details, like a thin handle on a dreidel cutter, don’t hold up as well. As for the food coloring you see in the video, I’m glad I waited to add it after spreading the whipped cream on the parchment—it created a cool double-layer effect, with the bottom remaining white and the top marbled in blue. That said, you can absolutely whisk the coloring directly into the cream for an even color throughout.
Frozen Whipped Cream
What you’ll need:
1 cup heavy whipping cream (must be cold!)
4 tablespoons powdered sugar
1 tablespoon cornstarch
1 1/2 teaspoons vanilla extract
Optional garnishes: crushed gelt, edible gold leaf, food coloring (I suggest avoiding sprinkles here, as the color used in some brands might bleed)
What you’ll do:
Add the cream, sugar, cornstarch, and vanilla to a large mixing bowl, then use a hand mixer to whip the mixture until soft peaks form. For this recipe, it’s okay to slightly over-whisk (you might notice some air bubbles in the final shapes), but be sure not to under-whisk.
Spread the whipped cream onto a parchment-lined baking sheet in an even layer using an offset spatula or a dinner knife (feel free to make a few batches on multiple pans if you’d like to experiment with different garnishes). Next, sprinkle your optional garnishes over the surface, or swirl in a few drops of food coloring for a marbled effect before smoothing over the top layer again—it should be flat and even.
Freeze the whipped cream for at least 6 hours until totally solid, then use the cookie cutters to create shapes and carefully pop them out using your fingers. Re-freeze those shapes on the same parchment-lined sheet until ready to use.
Here’s what’s going on in those Hanukkah treat boxes.
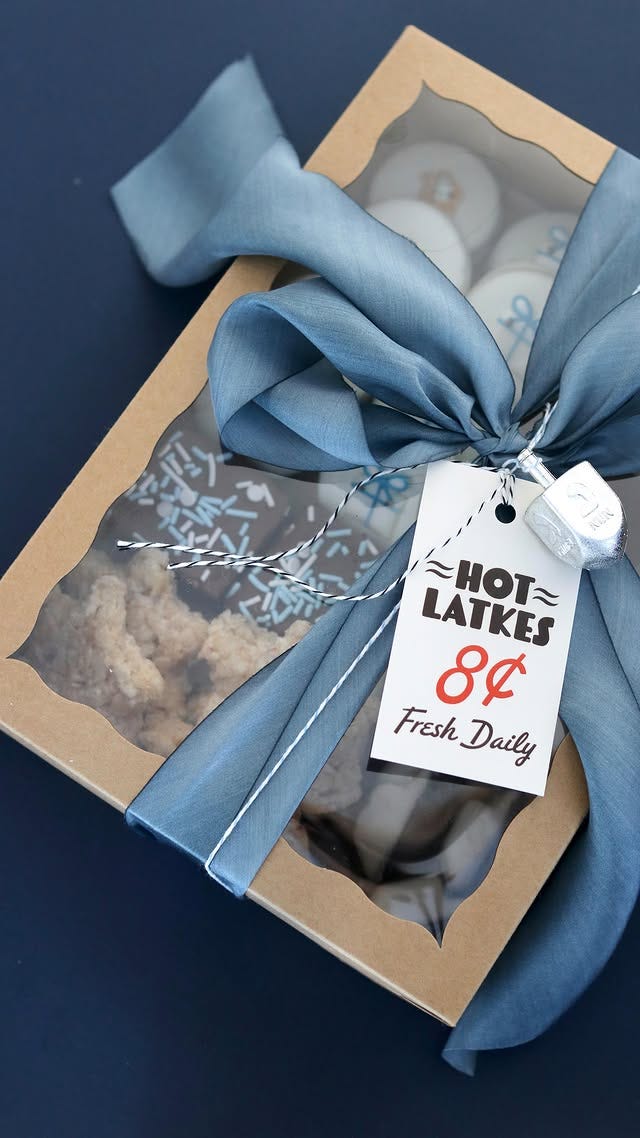
First and foremost, how amazing are those vintage latke gift tags by Everyday Yiddish? The owner of the shop sent me a pack (thank you, Jody!!!) and I just cannot get enough of them. And that perfect banjo rendition of Ma’oz Tzur is by Nefesh Mountain, and the latke sprinkles are by Sprinkle Robot.
Recipe details below:
BLACK-AND-WHITE DREIDEL COOKIES: Sugar cookie base—any cut-out sugar cookie recipe will do—cut into tiny dreidels and baked, then layered with half chocolate and half vanilla icing, as shown. I used a half-batch of Preppy Kitchen’s black-and-white cookie icing recipe. I decided to opt for sugar cookies instead of a classic b-&-w base because I didn’t think it’d be possible to shape that cakier texture into a dreidel shape. These were very difficult to frost efficiently because of their tiny size. But—worth it.
GELT BLONDIES: I used this recipe and thought it was excellent; I preferred it to the recipe I used to make a similar batch last year. I added gelt when the blondies were about 3/4 of the way through the baking process, then added the pan back to the oven. Going to bake them with the gelt added from the get-go next year!
FROSTED BROWNIES: The brownies are Ghirardelli (I maintain that box mix brownies are unbeatable) topped with Sam Adler’s 5-Minute Brownie Frosting and a smattering of Hanukkah sprinkles.
CHOCOLATE-COVERED OREOS: Just Oreos coated in white chocolate candy melts, then topped with an extra dab of melty chocolate “glue” and a Sprinkle Robot sprinkle.
RICE KRISPIE TREATS: I’ve been making Deb Perelman’s Salted Brown Butter Rice Krispy Treats for over a decade now, and they’re absolutely marvelous. (Though I’m partial to the “Krispie” spelling myself.) Here, I used an oiled cookie cutter to make the shapes, waiting about 15 minutes until the finished treats were no longer hot, but still warm enough to mold to the cutters. I’m not sure I’d recommend the shape route—it was messy and I had a hard time getting clean shapes. (P.S. Never refrigerate these treats, even momentarily, or they’ll become absolute rocks. I learned that lesson years ago. Still haunts me.)
Some homespun gift wrap ideas.

Hanukkah gift wrap never quite lives up to my expectations (and that’s when I can even find it in stores), so I decided to make my own this year—and I’m so happy with how everything turned out. I’ll try to update this with some higher-quality photos here tomorrow morning. A few very last-minute ideas below:
Start with a kraft paper (or butcher paper) base. It’s the perfect blank canvas for endless creativity and much more affordable than traditional wrapping paper—especially if you’re wrapping lots of gifts (easy to buy in bulk and reuse year after year). It can also be repurposed for table runners (and full table cloths), placemats, menus, and so much more. I also just think it looks lovely in a timeless, rustic sort of way.
Paint on ribbons… I used acrylic paint in a navy color with a basic brush; white would also be stunning and create a striking contrast against the kraft paper. Just something different and whimsical among all the other wrapping! And as we all know, beautiful ribbon can be super expensive as well.
…or add pom-poms! My favorite of all the wrapping experiments. You can go for a playful, colorful vibe (as I did with some of Jacob’s gifts, shown above) or stick to a more-sophisticated-but-still-quirky palette—for that, all-white or metallic tones might look nice. Hot glue and the pom-poms themselves are all you need to make it happen.
Happy Hanukkah!
Very inspired! Happy Chanukah!!!